
Today I put together a new video showing off some of the modding features for Crea. Enjoy!
Tag Archives: modding
Weekly Recap #7
I almost forgot about this! I am going to keep it reasonably short today and as a warning, it is a little technical. This last week I finally got to actually focus on mod support relating work. There is still a great deal left I would like to accomplish but I made a nice dent in it.
My major focus was rewriting how mod packages and their content is handled. Now mod packages have a load order which opens up several possibilities. The biggest one being that two packages can have the same content and the package with a higher priority gets loaded. With this new system, packages will be able to be enabled and disabled on a world basis – so players don’t have to adjust mod settings every time they want to switch worlds.
Another huge and welcomed change is that now content files are referenced by name (“wood”) instead of by path (“mods/base/item/materials/wood.ce”). This was actually a requirement for the mod content overwriting provided by mod priority. In other words, any where the game references “wood” another mod could provide that content and change how it works such as making it possible to place it down in the world and emit a light source.
Similarly, other assets, most specifically images, can now be referenced with a relative path. In content files you would normally be required to have “add(Render(‘mods/base/item/materials/wood.png’))”. Now it can just be “add(Render(‘wood.png’))”. Additionally, I added support for asset redirection, which makes it extremely easy to create texture packs.
Moving forward to this next week, I’m continuing to beef up the game engine for mod support. While I am at it I am also adding support that’ll enable us to add Realms into the game with relative ease when we are ready to. One of my goals is to try to solidify as much of the game engine as possible before we start making any real public pushes, such as Steam Greenlight or trying to get onto news sites.
Feature – Crafting and Research
Overview
There was never any question that Crea would have a crafting system and from day one I knew what I wanted out of it. The goal was to make discovery a key component and not have players be dependent on a wiki. Since then it has been a matter of how will it work. For a long time I thought I knew exactly how it would; however, after implementing it and facing several design issues I decided to step back and redesign.
Before being able to craft an item you must first learn what materials are needed. This can be done two ways. The simpler but less common way is to acquire a recipe/schematic that reveals all materials needed to craft the item. These recipes will be rare and only found as dungeon or boss loot. The usual route to learning an item’s recipe is through researching.
As we have always planned, researching is done through the Researcher NPC. When you talk to the Researcher you are presented with the simple research dialog.
There is one item slot where you can drop a material in and click “Research”. By doing so you research the capabilities of that material. This is not free though and does consume one of the material. The result is that a single recipe is revealed. However, if the recipe has multiple materials then all must be researched before the entire recipe is available.
The “Materials” button opens a window that shows the progress of each material so you know when you’ve fully researched a material.
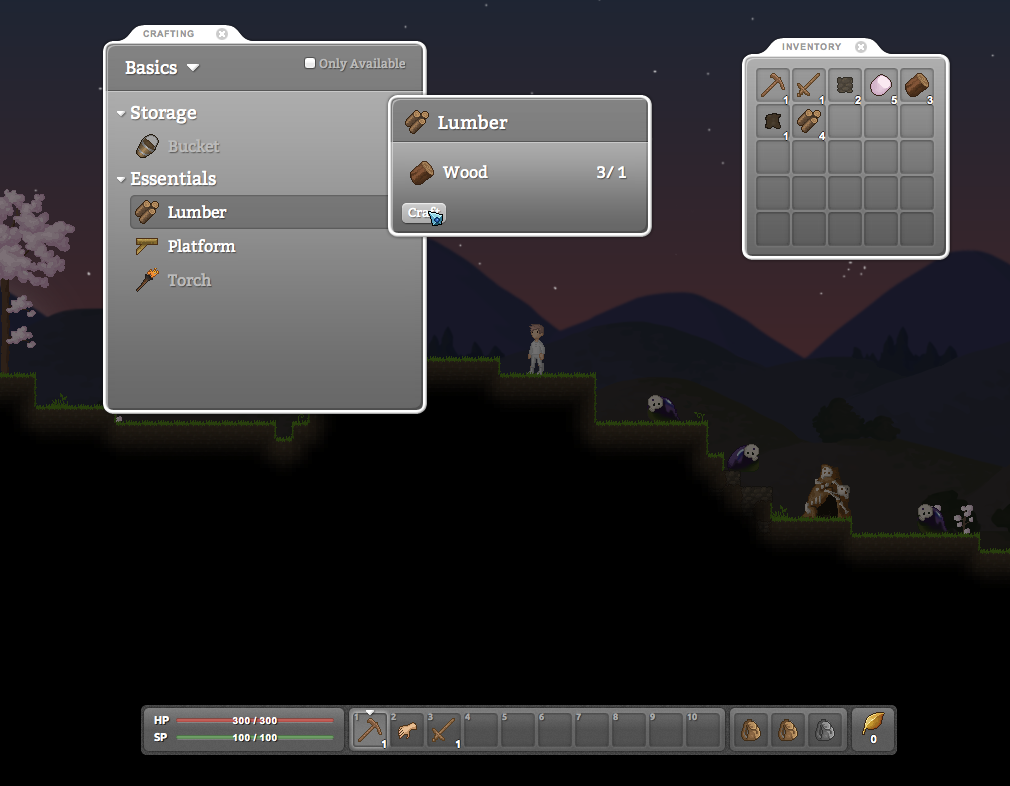
Once a item recipe is available you can easily craft it by opening your craft window, selecting the item and clicking “Craft”.
Modding
Both the crafting and researching systems are fully implemented in Python and consequently are completely moddable. Since these systems are hundreds of lines long I’ll forgo including them in this post, but they can easily be found and edited with the game. However, the majority of modding regarding these system will be done with creating item recipes.
An item recipe is always defined with the item and can be as simple as the following:
craft = Craft(category='Armor', subcategory='Chest', level=4, experience=30, service='Anvil')
craft.material('mods/base/item/recipes/smelting/copper_ingot.ce', 6)
add(craft)
Recipes can be much more involved with several additional attributes.
craft = Craft(category='Basics', subcategory='Essentials', level=1, experience=15)
# Any number of materials can be listed.
# craft.material('path/to/content.ce, quantity)
craft.material('mods/base/item/materials/wood.ce', 1)
# Recipes can have multiple results based on the quality of the craft.
# result(quantity, quality) - This is a short hand.
# Here the player will receive 4 of this item always since quality is always 0+.
craft.result(4, 0)
# and here the player receives one additional quantity if quality is 50+.
craft.result(5, 50)
# Results can also be created long hand.
# By doing this it is possible to expand on the yielded items and their quantity.
# This result occurs at quality of 100+ and will yield 5 lumber and even another item!
result = CraftResult()
result.quality = 100
result.items.append(InventoryItem("mods/base/item/basics/essential/lumber.ce", 5))
result.items.append(InventoryItem("mods/base/item/basics/essential/super_lumber.ce", 1))
craft.results.append(result)
# Sets if a recipe can be learned through research. Defaults to True.
craft.isResearchable = False
add(craft)
Realms

Because Crea’s biomes are randomly generated, they are always totally new worlds for players to explore. However, after playing in one world for awhile it starts to become too familiar. While it it’s wonderful to start from scratch and create a totally new world every once in awhile, sometimes players just want another dungeon to delve into. To remedy this, Crea will have what we are calling realms.
A realm is an entirely new area to explore separate from the main world but still accessible by special means. New realms can become available through exploration, unlocked by completing a quest, killing a boss, or any other means imaginable. Traveling between the world and realms is done through the use of Way Crystals; large crystals that mysteriously allow teleportation.

In Crea, certain rules apply to worlds, such that as players can build anywhere or that the world size is always very large. Realms, however, don’t have to stick to these rules. One realm could be as small as a single room. Maybe another realm doesn’t allow construction. By breaking the rules, realms enable the creation of areas and scenarios that were impossible before.
My favorite aspect to realms is that since they are loosely connected to the world they can be added and updated alongside existing worlds. For example, you could install a mod and through a quest gain access to an entirely new dungeon. Later you could get an update for this mod that builds additional content onto the dungeon. So realms can be continually evolving without interfering with the main world.
We plan to fully take full advantage of realms. Dungeons are a perfect fit. Some dungeons will be at a set level, while others grow in levels with your character so they will always provide a challenge. Most dungeons will be procedurally generated but some could be hand-crafted. All of the dungeons will be updated alongside existing worlds.
Dungeons are not the only use case though. We are considering some boss fights to be in special realms or perhaps at the end of a dungeon. We are also thinking other special areas could find themselves in realms. Casino?
Realms are currently planned for Beta Phase 3.
Feature – Character Progression
Overview
Close to the start of the Kickstarter, I wrote a post on character progression. This was a great thumbnail sketch of what character progression will look like. I have taken the time to flesh things out and clean some things up that I found troublesome with the initial sketch. Now character progression can be broken into two distinct parts – character level and talents.
The character level is strictly used for combat related things. It is used to represent your character’s strength and consequently is utilized in various combat algorithms such as the damage algorithm or for determining the monster levels. Upon leveling your character will gain stats. Also equipment will typically have a character level requirement.
Characters have talents that represent the character’s proficiency in a field. Currently we have four talents planned; Arms, Magic, Gather, and Craft. By performing actions related to the talent your character will occasionally gain TP (Talent Points). For example by crafting items or learning new recipes you may gain TP for your Craft talent or hitting a monster with magic may yield TP for the Magic talent.
After accumulating enough TP your character’s talent will level up. With enough TP you can spend it on purchasing and upgrading skills. Leveling up a talent grants access to new skills and skill upgrades. There will be a mixture of active and passive skills. Active skills are skills that can be added to the toolbar and used as an action such as a magic spell. Passive skills are always affecting the player such as “Defense Up”.
Early version of Talent window
Modding
As usual, nearly all aspects of talents can be modified ranging from modifying an existing skill to creating an entirely new talent. Talents are tied to body types (covered in this post) meaning different races can have different talents.
As far as the actual modding goes, here is what the adding the talents to a character body looks like.
body.talents = Talents()
body.talents.talents.append(armsTalent)
body.talents.talents.append(craftTalent)
body.talents.talents.append(gatherTalent)
body.talents.talents.append(magicTalent)
A Talent is simple and is only composed of a name, a “points to next level” list, and a list of skills.
armsTalent = Talent("arms", [100] * 20)
Skills are a little bit more complex. First of all, skills can passive and/or active. A passive skill is always in effect while an active skill must be used. It is possible to have a skill with both elements. Passive skills need to provide two callback functions – “enable” and “disable”. Active skills need to provide the callback function “use”. All skills should provide a “description” callback function.
def enableStatUp(stat, level, user):
    user.stats.get(stat).adjust(5 * level)

def disableStatUp(stat, level, user):
    user.stats.get(stat).adjust(-5 * level)

def descriptionStatUp(stat, level):
    return "Increases a character's {} by {}.".format(stat, 5 * level)

atkSkill = Skill(name="Attack Up", icon="mods/base/talent/arms/attack_up.png", costs=[100] * 5)
atkSkill.enable = partial("ATK", enableStatUp)
atkSkill.disable = partial("ATK", disableStatUp)
atkSkill.description = partial(descriptionStatUp, "Attack")
armsTalent.skills.append(atkSkill)

defSkill = Skill(name="Defense Up", icon="mods/base/talent/arms/defense_up.png", costs=[100] * 5)
defSkill.enable = partial("DEF", enableStatUp)
defSkill.disable = partial("DEF", disableStatUp)
defSkill.description = partial(descriptionStatUp, "Defense")
armsTalent.skills.append(defSkill)
The “enable” function is called when the skill is activated. This is when the player first get the skill or when the character is loaded. The sibling function, “disable” is used when the skill needs to be deactivated. This is typically when the character is being saved to disk but it also makes it possible to temporarily disable passive skills with monster abilities. The “description” function is called when we need to display the tooltip for the skill. Having it be a function makes it dynamic so it can be dependent on any variable – such as the level of the skill. The “use” function is not featured here but it is more or less the same as the previous functions. It is called when the skill is being used.
Creating skills and entirely new Talents is definitely some more advanced modding. However, with the complexity comes some awesome power and I am anxious to see what skills players come up with.
Feature – Dynamic Music

Charlie (Robot Science) and me (Jasson) working on Dynamuse
Overview
The music in Crea will be dynamically generated. This means you will never hear the exact same track twice. The music is broken down into small sound clips that I am calling “samples”. These samples are played dynamically based off of some parameters such as how much danger you’re in, time of day, and how long the track has been playing.
The thing that turned me onto doing dynamic music was watching Renaud Bédard’s GDC talk Cubes All The Way Down. I had not heard too much about dynamic music in games, but I knew that it would be a perfect fit for a sandbox game. It is so easy to get sucked in for hours and before too long the music becomes very very very repetitive. What do we do when this happens? Mute! I know that’s what I do and it is a shame since video game music is so great. My hopes are that by making the music dynamic it doesn’t get repetitive enough to warrant mutiny…
As I have mentioned before, I made a tool for Charlie that I dubbed “Dynamuse”. Dynamuse is used to define the rules for when samples should play in a track. I will admit that Dynamuse is a little on the complicated side but with that comes much power. I recently got Dynamuse more or less completed and soon we will be hearing its true power.
Version 2 of Dynamuse
Modding
Because I’m all about modding and being open, I’m going to make Dynamuse available to everyone. That means that anyone who wants to can modify existing tracks or even create their own. Eventually I will make a tutorial on how to use Dynamuse, but for now here’s a brief overview of how it works.
A Dynamuse track is composed of any number of samples. A sample has a name and music file associated with it and it also contains a list of triggers. A trigger contains a few things but most importantly it contains a list of conditions. There are several types of conditions such as time of day, status of another sample (playing, paused, or stopped). If a trigger has all of its conditions met then it signals the sample to play. And that is about it. Simple, right? (not quite unless you’re a programmer)
Functional Is Not Finished

Has anyone noticed how long Crea is taking? I know I have! Just a few months ago I was certain I would have Crea more or less finished by now and yet here we are still months away from a reasonable release date. “Why is this?” is something I have been asking myself recently. What is making things take so long?
I looked behind me to what I have been working on over the last few months and then ahead of me to what I will be working on and the answer became clear. There has been multiple factors that are causing these delays such as a feature taking longer to implement than expected or completely overlooking a feature when I made the release date estimates. However, without a doubt, the largest contributor is the mistake of confusing functional as finished.
When we launched Crea’s Kickstarter I truly tried to make pessimistic estimates on the release dates. I was secretly hopeful that the stars would align and Crea would come out even sooner. After all, I had the basic exploration working along with world generation, character creation, crafting, user interface, and many other things. That means I was done with these and only have to look forward to the remaining features, right? Note quite.
As it turns out, function is not finished. Many of these features only had the bare necessities implemented and were by no means ready for prime time. Take the world generation for example. Back in June it did create a randomly generated world but, as it turned out, it was very hard to build onto these generated worlds. Even more pressing, the generation would take 45 seconds for a small world and I was too scared to try a large world that is 8 times larger than the small. For some time I closed my eyes and marched on as if the problem would magically go away. It didn’t.
There are several other examples. The user interface was difficult to build onto and hardly moddable. The crafting was missing the concept of recipes the player would learn. The networking is too slow and probably needs to be moved from TCP to UDP, a major rewrite of the networking code. Add all of these up and you have a few months of added development.
This is not all bad news though. With every upgrade, Crea gets that much better. I want to ensure that Crea is representative of my best work. I do plan to release Crea before some minor features have been finished, but the features I do release with I want to be polished and ready to be built onto.
…So when is Crea coming out?
Tooltips and Japanese
Decided to work on tooltips and while I was at it I decided I would once again verify that Crea was indeed localization friendly.
Styling will likely change (such as font size). Also note that this was just a test. Crea has not been translated to Japanese.
Needless to say, I am quite excited about both of these. I was unsure of how to implement tooltips for a while now and decided to finally tackle it. Also I had not tested a foreign language on the new UI and so it was a pleasant surprise to just see everything work as expected.
And here is the English version for your viewing pleasures.
From Good to Awesom-ium
This has been quite a week! We FINALLY released alpha to a handful of people and it has been well received. Just over the course of a few days over two dozen bugs were uncovered (some already known) and half of them fixed. Between the bug fixes I began looking into moving the UI (User Interface) over into python. Why? I wanted to make all of the UI completely moddable and make it easy to add in new UI through mods. I had attempted this before and had problems getting the library I was using to be exposed. That was when I found something very shiny – Awesomium.
Awesomium is a full fledged “web UI bridge for native applications.” In other words, it is Google Chrome inside Crea. This was not the first time I had looked at Awesomium. I had considered it before for a previous project but had foolishly decided against it.This time I was no fool.
I have made the jump and I’m not looking back. I have been making great progress over this last week. This has been one of my most focused weeks – ever. I completely tore out the previous UI which I fortunately had the foresight to decouple from the rest of my engine as much as possible. Then I implemented Awesomium and got a prototype working surprisingly quickly. From then on I have been working on re-implementing Crea’s UI such as the menus, inventory, crafting and so on.
What does this all mean?
- Crea UI will be 100% moddable
- UI visuals and interaction is implemented in HTML5/CSS3/Javascript
- UI interfacing with game logic is implemented in Python
- Crea’s UI will be Awesome
For those web devs reading this, we have decided to use JQuery, Ember and Handlebars for templating and data binding the UI. You can also point your browser to a port on your localhost and you get full access to Google Chrome Developer Tools for the UI in the game. How awesome is that?
Screenshots coming soon!
Oh! I almost forgot I am doing regular livestreams now! Click for more details.
Feature – Interactive World
Overview:
As expected in a sandbox game, worlds in Crea can be fully reconstructed. Terrain exists on two tile layers referred to as ground layer and wall layer. The ground is collidable and sits in front of the wall layer which is not collidable. Aside from being able to rebuild the terrain, it is also possible to place and remove entities such as tables and treasure chests.
Unlike tiles which are grid based, entities are free to be placed wherever there is provided support. Item placement has been made as simple and intuitive as possible. When a position is suitable for placing the active item a visual hint is provided, that is a transparent rendering of the item and where it will be placed at. If an item does not quite fit where the mouse is hovered but there is an available nearby space then it will show a hint there.
These items can then be interacted with, such as opening a door or flipping a switch. Interacting with an item is not restricted to right clicking on it though. There are other interactions such as harvesting it with an axe, stepping on a button, using an item or attempting to remove the item’s support. With all of these interactions, the world moves from a static playground to a very much interactive and alive one.
Modding:
The key to having an interactive world is the modding support. New tiles can be created, there is a placement component that can be added to any item, and an interactive component added to any entity.
Creating a new tile requires the use of the TileComponent. Here is an example with some embedded comments.
name = 'Dirt'
render = Render('mods/base/tile/dirt.png')
add(render)

#ItemComponent making it possible to collect this tile
item = Item()
item.stack = 999
item.delay = 50
add(item)

#TileComponent
tile = Tile()
#Number of tile variants
tile.variants = 3
#Tile priority used for tile overlapping
tile.priority = 10
#Amount of life the tile has.
tile.durability = 10
#Defines the groups the tile belongs to.
#This is used for tool compatability among other things.
tile.groups = ['soil']
#The layer this tile is placed on - either 'ground' or 'wall'.
tile.layer = "ground"
add(tile)

#This sets up the frames for the tile to make it easy to draw
render.data = standardTile(tile.variants, tile.priority)
As mentioned above, there is a placement component which makes very easy to make items placeable. A item PlacementComponent is composed off a list of possible axes that the item can be placed on.
placement = Placement()
floorAxis = PlacementAxis(AxisType.AXIS_FLOOR, Vector(5, 37))
floorAxis.addSupport(PlacementSupport(SupportType.SUPPORT_TOP, Vector(5, 37)))
placement.addAxis(floorAxis)
add(placement)
The item can be placed on any axis but only one at a time. The types are floor, ceiling, left, right, backwall and wall. The ‘backwall’ is support from the wall layer and ‘wall’ is the combination of left and right. In addition to the axis type, each axis has a range, an area, and a list of supports.
The range of an axis defines where and how much support is needed to place the item down. This is the second parameter for PlacementAxis. Here we have Vector(5, 37), which means to start at pixel 5 on the bottom of the image (since it is floor axis) and go for 37 pixels. This will default to starting at 0 and using the entire axis length (width or height of image). The reason for this feature is to enable items to have a skinny base and only require support for the base and not the entire width of the item, such as a candelabra.
Area for an axis is the game’s physical representation of the item relative to upper left corner of the image. This area is used to reserve space for items in the world. This area defaults to the size of the image.
The last part of an axis is the list of support it can provide. It is defined very similarly to an axis with a support type and a range of where and how much support to provide. The type can be on any one of the four sides; top, bottom, left or right.
Moving onto InteractableComponent, which is much simpler. An InteractableComponent contains a list of interactions and a callable object. Here is an example of the door InteractableComponent.
def interactDoor(args):
    #Toggle between being open and closed
    #We can check which animation is currently being played to know the state
    door = args["entity"]
    if door.animation.isPlaying("closed"):
        door.animation.play("open")
        door.physics.setActive(False)
    else:
        door.animation.play("closed")
        door.physics.setActive(True)

interactable = Interactable()
interactable.add("interact", interactDoor)
add(interactable)
The second to last line adds an interaction, the “interact” which is called when right clicking on an item. As mentioned in the overview there are several interactions built into the engine. Because the interaction is simply a string, it is entirely possible to create new interactions.
Links:
- Feature Post - Stay up-to-date with this feature here!
- Discussion Thread - Want to discuss this feature? Join us on the forums.