Category Archives: Game Development

Development Stride

The past month I have hit an amazing development stride on Crea. I am more focused than I have ever been and continue to make unbelievable progress. I am utterly obsessed. When Kelley takes me out on my daily walk I have a hard time not talking about Crea and an even harder time not thinking about it. If this is the price for raw productivity then I’ll take it!

During this stride I have tackled some major issues. One example, which I mentioned in my last blog post, I completely rewrote all of the user interface code. Since that post I have written all of the previously implemented game UI which includes the crafting, equipment, inventory and toolbar. While doing this I was sure to polish some features and move them much closer to “complete”. Such as I finally added the concept of learning item recipes to be able to craft them. Or I made it so that ctrl+click on equipment will automatically swap it with your currently equipped item.

Inventory close to being finished

Another major feat is that I rewrote the world generation. In an earlier post I talked about optimizing the world generation and how it was just too slow. I decided to completely get rid of the random noise and go with using stamps to build up a world. This was a HUGE success and generating a small world went from about 45~ seconds to now 3~ seconds. Even a humongous world, 16384×3072 tiles only takes about 15~ seconds to be generated. Not only is it much faster, but we also now have much more control over the shape of the world.

What the world generation output currently looks like

There are lots of other smaller changes that have been happening which are mostly cataloged in our project plan. On there you can also see some of the tasks I have coming up. The next two big ones are Dynamuse and Combat Refinement.

Dynamuse is a little application I’m putting together for Robot Science to be able to compose tracks that will be dynamically generated during gameplay based off of a few parameters such as the time of day and the intensity of the situation. The motivation behind this is to avoid extremely repetitive music that you inevitably mute.

Dynamuse Mockup – Be glad I’m not doing the UI

The Combat Refinement is a little more vague and I will likely do an entire post on the topic at some point. We have very basic combat implemented at the moment. You are able to swing a sword, very similar to Terraria’s long swords, and hit monsters. It is functional but not quite what we want. My goal for combat is to be a little more involved and skill based rather than “click-click-click-cli-cli-click”.

One of the biggest challenges with combat in a sandbox game is that the world can be reconstructed and, if we’re not careful, could easily mean some monsters are unable to even reach a player. So, some of the things we are looking at are: monster mobility, range attacks, multiple attack animations for a single type of weapon, skill and magic types. It is a lot but I have a good feeling we’ll be looking back at it before too long thankful that we took the time to refine things.

Oh and I’m still doing livestreams everyday. Feel free to drop in anytime!

From Good to Awesom-ium

This has been quite a week! We FINALLY released alpha to a handful of people and it has been well received. Just over the course of a few days over two dozen bugs were uncovered (some already known) and half of them fixed. Between the bug fixes I began looking into moving the UI (User Interface) over into python. Why? I wanted to make all of the UI completely moddable and make it easy to add in new UI through mods. I had attempted this before and had problems getting the library I was using to be exposed. That was when I found something very shiny – Awesomium.

Awesomium is a full fledged “web UI bridge for native applications.” In other words, it is Google Chrome inside Crea. This was not the first time I had looked at Awesomium. I had considered it before for a previous project but had foolishly decided against it.This time I was no fool.

I have made the jump and I’m not looking back. I have been making great progress over this last week. This has been one of my most focused weeks – ever. I completely tore out the previous UI which I fortunately had the foresight to decouple from the rest of my engine as much as possible. Then I implemented Awesomium and got a prototype working surprisingly quickly. From then on I have been working on re-implementing Crea’s UI such as the menus, inventory, crafting and so on.

What does this all mean?

  • Crea UI will be 100% moddable
  • UI visuals and interaction is implemented in HTML5/CSS3/Javascript
  • UI interfacing with game logic is implemented in Python
  • Crea’s UI will be Awesome

For those web devs reading this, we have decided to use JQuery, Ember and Handlebars for templating and data binding the UI. You can also point your browser to a port on your localhost and you get full access to Google Chrome Developer Tools for the UI in the game. How awesome is that?

Screenshots coming soon!

Oh! I almost forgot I am doing regular livestreams now! Click for more details.

Optimizing Systems

In software development there is this pitfall known as pre-optimization, which is the attempt to make code more efficient before it has even been proven to be a problem. I have been careful not to fall into this trap and I think I have done a reasonably good job at it.  So much so that this past week I noticed that the game was running under 60 fps. Next thing I knew I was waist deep in a code profiler, the debugger, and my paper notepad filled with ideas. In the end I came out victorious with three beasts slain at my feet and Kelley wearing a tightly corseted gown, gratefully clinging to my muscular arm.

The first of the three, the lighting system, was a tricky one. The lighting is made up of thousands of tiny squares called subtiles. Each square is 4×4 pixels which means there are 16 of them in a single tile. That means if the resolution is only 1280×1024 then there are 81920 subtiles. That’s a lot! I have some awesome algorithms to calculate the lighting at blazing speeds, but when it came to rendering them, I didn’t have much optimization I could make.

Profile of my lighting rendering code

After an arduous journey to the top of a mountain, I sat in meditation for 3 days until the solution was given to me in a vision. A great deal of the tiles are a solid value – either pure black or pure white. With this I made light represented by a solid tile and only broke it down into subtiles if the tile needed multiple values. After a day of rewriting a large portion of the lighting system to handle this concept, I was greeted with a constant 60fps, up from the lowly 40~fps. The first beast was slain and onto the next I galumphed!

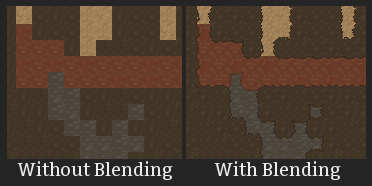
The second beast was one I had been avoiding for awhile for no real reason – tile blending. Tile blending is a cool concept I came up with awhile back that helps smooth the transition from one tile type to another.

Each tile type has a priority. When a tile is drawn it checks its four direct neighbors and if it has a higher priority then it slightly draws over that neighbor. The problem with this is that I was comparing the tile priorities every frame, slowing down the fps rate.

Fortunately a profound solution was not required this time. I made the exchange of memory for cpu. Now every tile is caching if it has priority over each neighbor using a bitwised enum stored in a single byte. Since I only have a fraction of the world loaded at a time this is not such a bad thing. And on I went to the final beast.

The last of the beasts is the world generation. We’ve been building onto the world generation for awhile now (and it’s still in progress) and it started to get way too slow. It was taking nearly 2 minutes to generate just a small world. So I unsheathed my mighty brain powers and did what I do best – code!

I quickly found that this beast was no ordinary beast. It was a hydra and had three issues that I had to cut through. Before getting into the gory details, I’ll give a brief overview of how the world generation works. First the world terrain is created and everything is either dirt or sky. Then the “world” biome is placed down which is a pass over the entire world such as adding in other tile types such as silver and gold. After this all of the biomes are laid out and each performs its own actions to reshape its allotted area.

The first and remaining issue is that the first step, the terrain generation, takes about 98% of the processing time. The way I am generating the terrain, through the Accidental Noise Library (ANL), is just very slow. There are likely optimizations I can make, I just need to continue hacking.

Another issue that really started slowing things down was the way we were placing down all of the tiles during the world biome pass. I would randomly calculate an area to place the tiles in and then generate a circle with noise once again going through ANL. Doing this a few hundred times was just too much. I realized that I did not really need to generate a new circle with noise every time. No one would notice if we reused the same ones especially if we stretch and flip them. Thus the concept of “stamps” was born. Stamps can either be created from noise generation as before or from an image.

The final issue was with an unmentioned feature/tool – creating an image out of the generated world. I put this together so it would be easier for us to iterate on the world generation. But there was a problem with it… It was taking 30 seconds. It was still worth it but still – ouch! I quickly verified that the part I suspected was indeed the culprit. Reading through all of the tiles and converting them into a color to save to the image was taking 99% of the time. This was written in python so I moved just this part into C++. It went from 30 seconds to roughly 1 second. Victory was mine!

Alpha Map with sword and bed stamps

Needless to say, I’m covered in the bloody remains of ones and zeros.

Feature – Inventory and Toolbar

Overview

The player’s inventory in Crea is handled through bags. A bag is an item which, when equipped, provides additional inventory for the player. Once equipped, a bag can only be unequipped if it is empty. The number of bags a player can equip is increased by leveling up in the gathering proficiency. Bags can also be upgraded to hold more items. Since a bag is an item that means it can be traded to other players or given to new characters.

Bags are for storing items and the toolbar is for using items. The toolbar is only a reference to an item type. Consequently, a dirt block on your toolbar would represent all of the dirt in your bags. When an item is completely consumed the item remains on the toolbar unavailable until you get more.

Modding

There are two components specifically for these, InventoryComponent and ToolbarComponent. The InventoryComponent allows you to get access to all of the bags the player currently has equipped as well as check and change the items in each bag. Similarly with the ToolbarComponent you can check and change the item references in each spot.

Links

Feature – Interactive World

Overview:

As expected in a sandbox game, worlds in Crea can be fully reconstructed. Terrain exists on two tile layers referred to as ground layer and wall layer. The ground is collidable and sits in front of the wall layer which is not collidable. Aside from being able to rebuild the terrain, it is also possible to place and remove entities such as tables and treasure chests.

Unlike tiles which are grid based, entities are free to be placed wherever there is provided support. Item placement has been made as simple and intuitive as possible. When a position is suitable for placing the active item a visual hint is provided, that is a transparent rendering of the item and where it will be placed at. If an item does not quite fit where the mouse is hovered but there is an available nearby space then it will show a hint there.

These items can then be interacted with, such as opening a door or flipping a switch. Interacting with an item is not restricted to right clicking on it though. There are other interactions such as harvesting it with an axe, stepping on a button, using an item or attempting to remove the item’s support. With all of these interactions, the world moves from a static playground to a very much interactive and alive one.

Modding:

The key to having an interactive world is the modding support. New tiles can be created, there is a placement component that can be added to any item, and an interactive component added to any entity.

Creating a new tile requires the use of the TileComponent. Here is an example with some embedded comments.

name = 'Dirt'
render = Render('mods/base/tile/dirt.png')
add(render)

#ItemComponent making it possible to collect this tile
item = Item()
item.stack = 999
item.delay = 50
add(item)

#TileComponent
tile = Tile()
#Number of tile variants
tile.variants = 3
#Tile priority used for tile overlapping
tile.priority = 10
#Amount of life the tile has.
tile.durability = 10
#Defines the groups the tile belongs to.
#This is used for tool compatability among other things.
tile.groups = ['soil']
#The layer this tile is placed on - either 'ground' or 'wall'.
tile.layer = "ground"
add(tile)

#This sets up the frames for the tile to make it easy to draw
render.data = standardTile(tile.variants, tile.priority)

As mentioned above, there is a placement component which makes very easy to make items placeable. A item PlacementComponent is composed off a list of possible axes that the item can be placed on.

placement = Placement()
floorAxis = PlacementAxis(AxisType.AXIS_FLOOR, Vector(5, 37))
floorAxis.addSupport(PlacementSupport(SupportType.SUPPORT_TOP, Vector(5, 37)))
placement.addAxis(floorAxis)
add(placement)

The item can be placed on any axis but only one at a time. The types are floor, ceiling, left, right, backwall and wall. The ‘backwall’ is support from the wall layer and ‘wall’ is the combination of left and right. In addition to the axis type, each axis has a range, an area, and a list of supports.

The range of an axis defines where and how much support is needed to place the item down. This is the second parameter for PlacementAxis. Here we have Vector(5, 37), which means to start at pixel 5 on the bottom of the image (since it is floor axis) and go for 37 pixels. This will default to starting at 0 and using the entire axis length (width or height of image). The reason for this feature is to enable items to have a skinny base and only require support for the base and not the entire width of the item, such as a candelabra.

Area for an axis is the game’s physical representation of the item relative to upper left corner of the image. This area is used to reserve space for items in the world. This area defaults to the size of the image.

The last part of an axis is the list of support it can provide. It is defined very similarly to an axis with a support type and a range of where and how much support to provide. The type can be on any one of the four sides; top, bottom, left or right.

Moving onto InteractableComponent, which is much simpler. An InteractableComponent contains a list of interactions and a callable object. Here is an example of the door InteractableComponent.

def interactDoor(args):
    #Toggle between being open and closed
    #We can check which animation is currently being played to know the state
    door = args["entity"]
    if door.animation.isPlaying("closed"):
        door.animation.play("open")
        door.physics.setActive(False)
    else:
        door.animation.play("closed")
        door.physics.setActive(True)

interactable = Interactable()
interactable.add("interact", interactDoor)
add(interactable)

The second to last line adds an interaction, the “interact” which is called when right clicking on an item. As mentioned in the overview there are several interactions built into the engine. Because the interaction is simply a string, it is entirely possible to create new interactions.

Links:

Feature – Equipment

Overview

All equipment in Crea is randomly generated to some degree. Each piece of equipment is made up of attributes. These attributes can be either positive or negative effects such as stat increase/decrease, increased health regeneration, or vampiric hit. The human race has a large assortment of equipment slots: Head, Body, Hands, Legs, Feet, Ring, and Neck. All but the last two will change your character’s appearance.

The majority of equipment found in Crea will have some constant attributes as well as some random ones. Such as all Copper Greaves will always have a DEF +5 attribute and will randomly be assigned 0-2 of the following attributes: ATK +(1 to 2), MDEF +(2 to 4), and AGI +1. (This is just an example).

Modding

All aspects of equipment are completely moddable. Not only can you create new pieces of equipment, it is very possible to create entirely new attributes and even add new equipment slots.

Creating a new piece of equipment is reasonably simple. In addition to creating a normal item entity (Render, Item, Craft components), add an equipment component to an item. An Equipment component has a list of image substitutions and a function (onCreate) called when a new piece of that equipment is created. Inside of the onCreate function is where attributes are added to the equipment component.

equipment = Equipment('chest')
#These are image substitutions similar to what is discussed in Character Customization
equipment.addSub('customizations/shirt_front.png', 'mods/base/item/armor/chest/silver_breastplate/torso.png', Vectorf(2, 0))
equipment.addSub('customizations/sleeve_lower_0.png', 'mods/base/item/armor/chest/silver_breastplate/arm_lower_0.png')
equipment.addSub('customizations/sleeve_upper_0.png', 'mods/base/item/armor/chest/silver_breastplate/arm_upper_0.png')
#... and more substitutions

def createSilverChestplate(component):
    component.addAttribute(ChangeStatAttribute('HP', 5))
    component.addAttribute(ChangeStatAttribute('Attack', 3))

equipment.onCreate = createSilverChestplate
add(equipment)

Creating a new type of attribute involves a new python class that implements an interface. Here is an example with a brief description is provided with each method.

class ChangeStatAttribute(object):
    name = "ChangeStat"
    def __init__(self, stat='', value=0):
        self.stat = stat
        self.value = value
        self.changed = 0

    def alignment(self):
        #Called to determine if this is a positive or negative attribute
        return self.value >= 0

    def quality(self):
        #Reports the quality of this attribute. The quality of an equipment piece is the sum of its attributes.
        return self.value * statWeights[self.stat]

    def onEquip(self, args):
        #Called when this attribute is being equipped
        player = args['player']
        stat = player.stats.get(self.stat)
        if stat.hasMax():
            self.changed = stat.adjustMax(self.value)
        else:
            self.changed = stat.adjust(self.value)

    def onUnequip(self, args):
        #Called when this attribute is being unequipped
        player = args['player']
        stat = player.stats.get(self.stat)
        if stat.hasMax():
            stat.adjustMax(-self.changed)
        else:
            stat.adjust(-self.changed)
        self.changed = 0

    def save(self, stream):
        stream.saveString(self.stat)
        stream.saveInt32(self.value)
        stream.saveInt32(self.changed)

    def load(self, stream):
        self.stat = stream.loadString()
        self.value = stream.loadInt32()
        self.changed = stream.loadInt32()

When creating a new piece of equipment you must specify which equipment slot the new item is compatible with. In order to create a new equipment slot it only requires adding the slot to the character body script (see Character Customization). After this is done any new equipment can use the new equipment slot.

#Define which gear slots this body supports
#These show up in the character equipment UI in game
body.gear = Gear()
body.gear.slots.append(GearSlot("head", "mods/base/body/hm/gear/head.png"))
body.gear.slots.append(GearSlot("chest", "mods/base/body/hm/gear/chest.png"))
body.gear.slots.append(GearSlot("hand", "mods/base/body/hm/gear/hand.png"))
body.gear.slots.append(GearSlot("leg", "mods/base/body/hm/gear/leg.png"))
body.gear.slots.append(GearSlot("feet", "mods/base/body/hm/gear/feet.png"))

Links

Feature – Crafting

Overview

In Crea the majority of items are obtained through crafting them. Crafting is a simple process but in order to craft an item you first must obtain that item’s recipe. There are several means to acquiring recipes: monster loot; treasure chests; quests; and, most importantly, the Researcher NPC.

The Researcher is specifically for discovering new recipes. First you provide the researcher with materials. Upon returning to him after some time, you gain any recipes his research turned up. Upon request the research can provide hints as to what items he may need to discover more recipes.

After obtaining an item recipe, you must obtain the materials needed to craft the item. Additionally, many items will require you to be near “crafting surfaces” such as an anvil or furnace. To make crafter lives easier, materials in nearby containers will be accessible during crafting. This means you can stash all of your ingots in a treasure chest next to your anvil. Then you do not have to move them from the chest to your inventory before crafting.

Modding

Creating new items to craft is quite simple. All it requires is to add a craft component to the item. Through this you can specify the item’s category, subcategory, surface requirement (if any), list of materials and quantity required, and the quantity produced.

#Example for Copper Ingot
craft = Craft('Recipes', 'Smelting', 'anvil')
craft.add('mods/base/tile/copper_ore.ce', 3)
craft.quantity = 1

The surface requirement can be left empty to designate that the item can be crafted anywhere. If it is specified, the surface requirement does not refer to a crafting surface item but to a crafting surface service. There is a “Surface” component which enables entities to provide any number of crafting services.

Most items requiring an anvil can be crafted with any anvil; however, some special items may need an upgraded anvil. This upgraded anvil would provide the services needed for both the special items and any other items requiring an anvil. Any item can provide any surface service, so it is entirely possible to create uber surface items. It is of course possible to create entirely new crafting surface services that new items can require.

#Iron Anvil
surface = Surface(["anvil"])
#Uber Anvil
surface = Surface(["anvil", “uber anvil”])

Links

Feature – Character Customization

Overview

The character creation provides a great amount of customization. The first and most important choice the player has is choosing the type of body to use. The body type defines the majority of the aspects for the character – appearance, customizations, equipment, stats, and so on. A body type can be “human male”, “human female” or even some completely different race such as a Robot. Body customizations are a part of the rendered body that can be changed such as hair, shirt, pants, shoes, and accessories.

Aside from customizations, a body type also defines which equipment slots the character will have, the base stats for the character, and the proficiencies. Each of these will be expanded upon in their own respective feature posts. With these character aspects being associated to the body type means that entire unique characters can be created. Such as a Robot race that has its own unique pieces of equipment, customizations, stats, and proficiencies.

Modding

Every aspect of character customization is moddable: body types, customizations, equipment slots, stats, and proficiencies. I will cover all of this by going over the human male body script, which is quite lengthy. Some explanation is embedded in the code – Look for lines starting with ‘#’.

name = "Human Male"
body = Body('hm')

body.render = ModularRender('mods/base/body/hm/human.scml')

#Character's are rendered with a ModularRender.
#This means that the character is broken up into small sprites
#such as head, arms, hands, torso, legs, clothing, hair and so on.
#Each of these sprites can be replaced with another sprite.
#These mappings below associate a name with a sprite or group of sprites.
#This makes it possible to do things like recolor all body sprites or hide them.

body.render.addMapping('body', 'arm/arm_lower_0.png')
body.render.addMapping('body', 'arm/arm_upper_0.png')
body.render.addMapping('body', 'arm/hand_0.png')
body.render.addMapping('body', 'leg/leg_lower_0.png')
body.render.addMapping('body', 'leg/leg_upper_0.png')
body.render.addMapping('body', 'leg/foot.png')
body.render.addMapping('body', 'head/head.png')

#Lots more mapping removed for brevity...

#Sets the animation render ordering.
body.render.setOrder(['arm_back', '', 'arm_front'])

#Set up the body animations
body.animation = Animation("idle")
body.animation.bind('arm_back', 'run_arm_back', 'run')
body.animation.bind('arm_back', 'walk_arm_back', 'walk')
body.animation.bind('arm_back', 'idle_arm_back', 'idle')
body.animation.bind('arm_back', 'jump_arm_back', 'jump')
body.animation.bind('arm_back', 'fall_arm_back', 'fall')
body.animation.bind('arm_back', 'use_arm_back', 'use')
body.animation.bind('arm_front', 'run_arm_front', 'run')
body.animation.bind('arm_front', 'walk_arm_front', 'walk')
body.animation.bind('arm_front', 'idle_arm_front', 'idle')
body.animation.bind('arm_front', 'jump_arm_front', 'jump')
body.animation.bind('arm_front', 'fall_arm_front', 'fall')
body.animation.bind('arm_front', 'use_arm_front', 'use')
body.animation.setLooping('idle_arm_front', False)
body.animation.setLooping('jump_arm_front', False)
body.animation.setLooping('fall_arm_front', False)
body.animation.setLooping('use_arm_front', False)
body.animation.setLooping('use', False)
body.animation.setLooping("death", False)

#Here we add the customizations this body supports
#These show up in the Character Creation UI when this body is selected
hair = Customization('Hair', True)
hair.isOptional = True
body.addCustom(hair)

accessory1 = Customization('Accessory 1', True)
accessory1.isOptional = True
body.addCustom(accessory1)

accessory2 = Customization('Accessory 2', True)
accessory2.isOptional = True
body.addCustom(accessory2)

body.addCustom(Customization('Shirt', True))
body.addCustom(Customization('Pants', True))
body.addCustom(Customization('Shoes', True))

#Import this file and make substitions to body
#body.addSub('torso/torso.png', 'mods/base/body/hf/torso/torso.png')

body.hide('customizations/gloves.png')
body.hide('customizations/helmet.png')

#Define which gear slots this body supports
#These show up in the character equipment UI in game
body.gear = Gear()
body.gear.slots.append(GearSlot("head", "mods/base/body/hm/gear/head.png"))
body.gear.slots.append(GearSlot("chest", "mods/base/body/hm/gear/chest.png"))
body.gear.slots.append(GearSlot("hand", "mods/base/body/hm/gear/hand.png"))
body.gear.slots.append(GearSlot("leg", "mods/base/body/hm/gear/leg.png"))
body.gear.slots.append(GearSlot("feet", "mods/base/body/hm/gear/feet.png"))

#Define which stats characters with this body get
body.stats = Stats()
body.stats.stats.append(Stat('HP', 'HP', 300, 9999, True, True))
body.stats.stats.append(Stat('AP', 'AP', 100, 9999, True, True))
body.stats.stats.append(Stat('ATK', 'Attack', 100, 999, False, True))
body.stats.stats.append(Stat('DEF', 'Defense', 100, 999, False, True))
body.stats.stats.append(Stat('MATK', 'M Attack', 100, 999, False, True))
body.stats.stats.append(Stat('MDEF', 'M Defense', 100, 999, False, True))
body.stats.stats.append(Stat('AGI', 'Agility', 100, 999, False, True))
body.stats.stats.append(Stat('DEX', 'Dexterity', 100, 999, False, True))

#Define which proficiencies characters with this body get
execfile('mods/base/proficiency/craft/craft.py')
execfile('mods/base/proficiency/explore/explore.py')
execfile('mods/base/proficiency/fight/fight.py')
execfile('mods/base/proficiency/gather/gather.py')
body.proficiencies = Proficiencies()
body.proficiencies.proficiencies.append(craftProficiency)
body.proficiencies.proficiencies.append(exploreProficiency)
body.proficiencies.proficiencies.append(fightProficiency)
body.proficiencies.proficiencies.append(gatherProficiency)

add(body)

We are using Spriter for our character animations. Consequently, in order to create new animations or an entirely new body type then you must use Spriter. You can easily setup new sprite mappings, mentioned above at the top of the code.

A body script, such as the one above, defines the supported customizations; however, the actual customizations are defined elsewhere in their own scripts. Creating new customizations is reasonably straightforward. A customization is a very simple entity. It contains a “Custom” component which takes two parameters. The first is the name of the customization this is for and the second is if it supports recoloring or not. After that a Custom component can define any number of sprite substitutions that take place if this customization is used. Here we change what the top hair looks like and hide the bottom hair since it is unused.

name = "Guy Hair"
custom = Custom("Hair", True)
custom.addSub('head/hair_top.png', 'mods/base/custom/hair/hm_hair.png')
custom.hide('head/hair_bottom.png')
add(custom)

As you can see, creating new hair styles, clothing and any other customizations is very easy!

Links

Feature – Component-based Engine

This feature is fundamental to the game design and consequently all of the features. That is why it is being covered first. The next feature I plan to cover will be much more interesting – promise!

Overview

The engine that powers Crea is known as a Component-based engine. For anyone interested in modding Crea, this is a crucial aspect of the game to understand. Everything in Crea is made up of entities, and an entity is a container for holding multiple components. A component is common logic encapsulated.

Lets say we want to represent a table in Crea. We would start with a blank entity, then add a render component and direct it to use the table sprite. Having a render component enables the entity to be rendered – in other words, now the table will show up in the game. Next we add an item component which enables the table to be carried in a character’s inventory. Finally we want to add a craft component, which enables the table to be crafted.

Modding

As you can see, an entity is the sum of its contained components. It’s a pretty simple process of using components like building blocks to create something new.
A component-based engine is by nature very modular. There are currently 30 different components and growing. Here are some component examples.
  • Render – Used for rendering the entity
  • Animation – Enables the entity to be animated (requires render component)
  • Item – Treats the entity as an item making it possible to add to inventories
  • Craft – Makes it possible to craft the entity (requires item component)
  • Interactive – There are several ways to interact with an entity. Right click on it to “interact” or “use” it from your toolbar are just two examples.
  • Placement – Enables an item to be placed into the world from inventory (requires item component)
  • Monster – Treats the entity as a monster.

Sometimes, as a modder, you’ll find yourself in need of a component that does not exist – at least not yet! It is entirely possible to create a new type of component. Components have a simple interface and are created in a python script just like the rest of the content.

Links


World Looping

The last week I have been working on several different features: optimized world loading, horizontal world looping, and a secret feature I’m working on that I will announce in detail before too long. Aside from that I’ve been doing some other things such as getting the forums up and running!

The world loading optimizations I made are really going to make a huge difference with the game’s performance. Before the entire world would be loaded and stay loaded. Every single entity would be updated every frame. This all could be quite taxing on both the cpu and memory. Now the world is broken up into regions and a region is only loaded if it is needed. If a region is unused for awhile then it is unloaded. For a large world only 1/8 of it will typically be loaded at one time. That’s a huge difference!

While I was breaking up the world into regions I decided it was a good time to finally implement world looping. This means that if a player runs in the same direction then he will eventually loop back around to the same place he started. Another way to think of it is take a piece of paper and curl it up so that two opposite ends are touching. This is what the world looks like now. This world looping was actually quite a bit of work. I faced two major challenges with it.

The first one was getting the rending to work. If standing next to the world seam (where the two ends meet), then I needed to have the entities, tiles and whatever else render from two sides of the world.

The other challenge, the more difficult one, was that all of the systems relied on the assumption that the world started at (0,0) and ended at the world’s end. If something went past either of these points, across the seam, then it would be ignored. For example light would suddenly stop at the seam and cause some odd lighting as shown below. The light needed to jump across the world seam and affect the other end of the world. I had to worry about this for all of the other systems as well such as the automata (water) and physics. There are still a few issues with it that I need to cleanup but I’d say it is 90% of the way there.

Expect updates from me to come a little more frequently starting now.

Notice the line in the middle of the blocks. That’s the world seam and shouldn’t be visible…