Music in Crea

I’m very excited to announce that we have Robot Science doing the music for Crea. I originally fell in love with his music when I played the Dustforce demo about a year ago. I have not stopped playing his music since. The music style is a very relaxed yet upbeat ambient electronica.

Don’t leave this page without checking out his music first (links below). Your ears will rejoice!

Robot Science links: Facebook | Bandcamp | Soundcloud

He has another project Giraffage you should check out too.

Kickstarter Coming Soon!

We are currently crafting an awesome Kickstarter campaign, but it is missing something! Momentum. We need to build some juicy momentum over the next week in order to launch with a BANG. This is where you come in.

First of all, go to kick.siegegames.com and sign up to receive word the moment our Kickstarter launches. Once you have signed up you can share your referral link with your friends. The more you share the more we’ll reciprocate the love.

Several updates will be coming over the next week as we prepare for our launch and even more once we launch. Exciting times are ahead!

Plants Update

I wrote this last week put forgot to post it.

Got a large update today. The last week I have been in the zone and have gotten a great deal done. First off, we reworked our website a little. In my last update I said I was working on implementing plants. At that point I was still in the designing phase for them. Since then I have finished implementing them and much more.

For every feature my mantra is easily moddable but lots of control. All of the supported content up to this point has had one form of communication – engine asking for the entities components which are returned in component definition form. I struggled quite a bit while attempting to fit the plants into this format. I finally came to my senses and realized what I had to do.

All of the plant logic resides inside of python. How the plant grows, how it visually looks, how it is harvested, and even how it is planted. With this solution, any modder has unlimited control. As for the “easily” part of my mantra, I am wrapping the core plant concepts up into nice little python classes which are extremely simple to use. I have included the code below for those interested in its awesomeness.

Because of this approach I have had to go through my entire game engine and expose it to python. This is something I have been putting off because I wasn’t sure of the requirements, boost python is a little scary and I knew it was going to be quite an undertaking. With this beast finally slain, creating new content will be much easier and have even more freedom.

Here are some screenshots featuring the plants that can grow overtime and be interacted with. There is also an early version of the grass. Right now the grass just grows on soil and is destroyed when the tile underneath it is removed. Later today I plan to make grass occasionally spread to nearby areas as if seeds were dispersed.

You can harvest the trees too!

This is the Zebra tree script that most people will see and have to worry about. I hope most of this is self explanatory. We are adding the different components to the zebra tree entity and the ZebraTree class is used to override the default properties of the tree (which can be seen below). We can add bases, trunks crowns and saplings images and they will be randomly used in the appropriate places. We can also override many other properties such as the seed it produces how tall it can grow, and how fast it can grow.

name = "Zebra Tree"

add(ModularRender())

interactable = Interactable()
add(interactable)

class ZebraTree(Tree):
trunks = [TreeImage("mods/base/plant/tree/zebra/trunk1.png", 2, 28), 
TreeImage("mods/base/plant/tree/zebra/trunk2.png", 2, 28), 
TreeImage("mods/base/plant/tree/zebra/trunk3.png", 23, 28)]
crowns = [TreeImage("mods/base/plant/tree/zebra/crown1.png", 34, 101), 
TreeImage("mods/base/plant/tree/zebra/crown2.png", 31, 98)]
saplings = [TreeImage("mods/base/plant/tree/zebra/sapling.png", 8, 33)]
seed = "mods/base/plant/tree/zebra/seed.ce"

def __init__(self, entity, organic):
super(ZebraTree, self).__init__(entity, organic)
def createZebraTree(entity, organic):
return ZebraTree(entity, organic)

add(Organic(createZebraTree))

Here is the Zebra seed script which is really simple. As with all content entity scripts we add the needed components, this time a Render, Item and Interactable components. The important part here is that we add an interaction “use” and provide the “useSeed” function which is defined in the tree script just below this one. To make this function reusable the plant the seed creates needs to be bound to the function provided – in this case we provide the path to the zebra tree.

import functools

name = 'Zebra Seed'
render = Render('mods/base/plant/tree/zebra/seed.png')
add(render)
item = Item()
item.stack = 999
item.delay = 200
add(item)

interactable = Interactable()
interactable.add("use", functools.partial(useSeed, "mods/base/plant/tree/zebra/zebra.ce"))
add(interactable)

Now for the meat of the tree logic. Here is the tree script which contains the Tree class and useSeed function that are used in the above scripts. As with everything this is still in the works but is most of the way there. I’m not going to go into detail in this now since there is so much going on but if you understand it then awesome. Once things start becoming finalized we’ll write some official documentation on these sorts of things. I put this in a pastebin because it is somewhat large.

Tree script

Lastly, I wanted to throw in the grass code which I’m happy about because I was able to write it without making any engine code changes. There is still in the works but I have the basics down. I will likely do the same for the grass that I did for the tree and have a base Grass class and allow for inheriting and changing the properties without having to worry about the logic. Pastebin link for the same reason as above.

Grass script

Thanks for reading through all of this! I know it is a lot. I’m interested to hear what you think of this.

Trees of Crea: A Guide

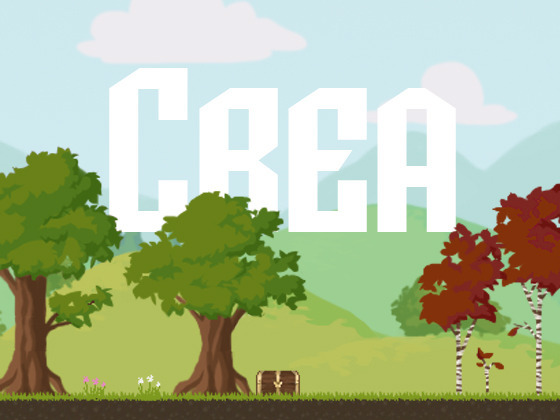
Hi, this is Kelley. I’m here to introduce you to some of the trees you’ll meet while exploring the world of Crea. The tree pictured above is a “tree.” It was the first one I drew for Crea; just sort of a generic type. Thus the name “tree.”

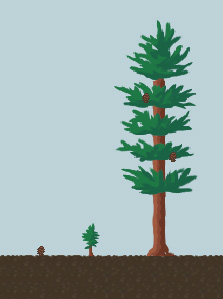
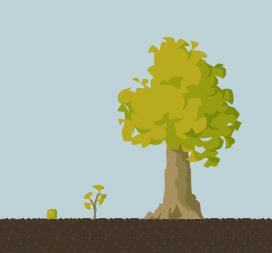
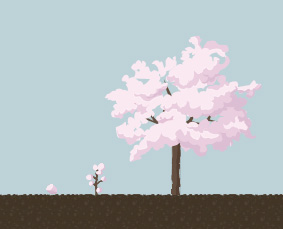
Designing trees is definitely my favorite task so far. Each tree comes in three forms: seed, sapling, and full-grown tree. Even the fully grown trees will have various heights and sizes, so they’ll look organic and not like clones of each other.

Here is a zebra tree.

Here is a mighty Redwood tree. It’s a little weird looking because it has to be cut up into segments, so that it can add on segments of branches as it grows.  I might revisit this one later, but part of me likes its strange shape.

This is a Ginko tree.

Finally, my favorite: the Marshmellow tree. It was originally supposed to be a cherry blossom tree, but it ended up looking more like it was made from cotton candy. Jasson suggested that the seed form of the tree is a marshmellow, which made me extremely happy. If only this tree really existed.

Leave a comment if you have any additional tree suggestions!

Alpha Feature Video

Over the last two months we have added in a great deal of new features. This video shows off a number of these alpha features: item placement, modular composite animations, crafting and a few other small things. Keep in mind that this is a work in progress.

In addition, Kelley has been working hard on character animations, new items and most importantly – llamas!

Latest Happenings

Hey, I missed last week’s update. Things have been busy for me! Lots of work, real life events and Diablo 3 have all been keeping me occupied. Fortunately all of these are wrapping up for me – just one last wedding this upcoming weekend. I still have managed to get some work on Crea done and soon much more.

Tiles changed from 24×24 to 16×16. This is a fairly large gameplay change but it is a good one as it will give players more creative freedom. Along with this change, Kelley remade and cleaned up the various tile types. Before too long we’ll put up a screenshot of them in game. For now this small sample will have to do!

In other news, we have been refining the character customizations and ensuring that they are implemented 100%. This includes things like adding armor to the character and what not. We still have some work left but it is coming together.

Kelley has also been working on some animations. Here is the walking animation. These are the base graphics we use for the character. Everything in game can be swapped out for other images and/or recolored.

The character and clothing are about 20 small images put together using Spriter. We also have a running, walking, jumping, falling, and swinging animations. All of which you will be seeing in good time.

David has been putting together a mockup of the final UI. Nothing about it has been finalized yet but just the mockup gives the game a much more polished look. Once we get something a little more final then I will be sure to post it.

Things are starting to come together!

Building Menus

The majority of my Crea time was spent working on the character creation menu. Once I got that fully functional, I moved onto designing and developing the character selection. In the middle of that I realized that my hacked together menu system finally needed to be upgraded. After some designing, I have come up with a much more manageable menu system, which means cranking out the world select and creation should be a breeze. That is once I get to those. In the meantime I am back on the character selection menu screen, which I should be finishing up tomorrow.

I would like to show screenshots of the character creation but I have left the UI extremely messy for David to come through and clean it up.Once he gets a chance to do that then I’ll be sure to post some screenshots.

In other news, Kelley will be finishing up her school semester this week and will be able to put much more focus into Crea so expect to see lots of visual goodies over the next few weeks. I know I’m looking forward to it!

Creating Placement Items

First of all, this builds on top of my previous blog update so you should read that now if you have yet to. This post will go a little more in-depth into what it takes to create an item that can be placed in the world.

Starting out lets say you are an amazing artist or have one on hand – like I do! Said artist has created an ingenious llama statue.

Hello, I am a Llama.

Now you want to place it into the game… but how do you do that? Inside of your item mod directory you need to create a content script so Crea knows about your statue. Here is what the script would look like.

name = 'Llama Statue'

#Render Component
render = Render('mods/base/item/llama_statue.png')
add(render)

#Item Component
item = Item()
item.stack = 999
item.delay = 200
add(item)

#Craft Component
craft = Craft('Home', 'Decoration', '') #Category, Subcategory, Surface
craft.add('mods/base/tile/stone.py', 50) #Materials needed
craft.quantity = 1 #Quantity made from a single craft
add(craft)

#Placement Component
placement = Placement()
placement.addAxis(PlacementAxis(AxisType.AXIS_FLOOR), Vector(5, 32))
add(placement)

I added in some comments for the crafting since I have not covered that before, but what we are really looking at is the placement component at the bottom. Items are composed off a list of possible axes that the item can be placed on.

The item can be placed on any axis but only one at a time. The types are floor, ceiling, left, right, backwall and wall. Backwall is the a tile in the wall layer. Wall is the combination of left and right. In addition to the axis type, each axis has a range, an area, and a list of supports.

The range of an axis defines where and how much support is needed to place the item down. This is the second parameter for PlacementAxis. In this case we have Vector(5, 32), which translates to start at pixel 5 on the bottom of the image (since it is floor) and go for 32 pixels. This will default to starting at 0 and using the entire axis length. The reason for this feature is to enable items to have a skinny base and only require support for the base and not the entire width of the item.

Area for an axis is the game’s physical representation of the item relative to upper left corner of the image. This area is used to reserve space for items in the world. This area defaults to the size of the image.

The last part of an axis is the list of support it can provide. It is defined very similarly to an axis with a support type and a range of where and how much support to provide. The type can be on any one of the four sides; top, bottom, left or right. Here is an example of a table placement with support on the top.

placement = Placement()
floorAxis = PlacementAxis(AxisType.AXIS_FLOOR)
floorAxis.addSupport(PlacementSupport(SupportType.SUPPORT_TOP, Vector(3, 57)))
placement.addAxis(floorAxis)
add(placement)

And now we have a llama standing on a table!

Here are a few cool features about the placement system.

  • Item placement is on a per pixel – not a grid.
  • Item placement is smart and provides some tolerance to moving to unavailable spaces.
  • When you have a placeable item as your active item you will see a semi-transparent hint of where it will be placed.
  • An item can have an animation component added to it with animations named to the different axes. The game will automagically use the correct animation when the item is placed.
  • An axis can have any number of supports, which means that you can do something like a Menorah.

Overall this system is really flexible and provides an extreme amount of power to both modders and world construction. Currently its biggest limitation is that items cannot be placed inside of another item. This limits some items such as a bookcase and placing individual books in it. It is probably still possible – just have to be creative! If the demand is high in the future I may revisit this limitation but for now it is something I am willing to live with.

Feel free to ask any questions or give constructive feedback. This is my first attempt at writing a more in-depth guide to modding.

Quick Update – Creating Characters

This last week I’ve been busy laying the foundation to be able to creating characters. This primarily consists of getting the character’s to be able to dynamically render and animate with customizations (hair, base clothing, etc.) as well as with equipment. We have been contemplating and discussing how we would go about doing this since the beginning and then I found Spriter.

Spriter is a software tool used to create 2D modular animations. This means breaking apart the character into tiny pieces and moving them individually instead of having a static frame. This enables us to create animations with lots of frames and only create the graphics once – making content creation as simple as possible. I will save the remaining details for next week.

Aside from the animations I have begun constructing the UI for actually creating characters. Things are going well and I do not see any reason it wont be finished by next week’s update.

Speaking of UI, my good friend David has officially joined the team. He has been helping out since the beginning and was definitely Crea’s #1 fan. He is a professional web designer/developer and consequently will be focusing on the UI. I’m sure it wont be too long before I am showing off his work here.

Stay tuned!

Chat and Item Placement

Time for the weekly update! This last week was another productive week but it took an unexpected turn. At the start I was planning to get chat, item placement and some other feature done. I breezed through chat as I suspected, and once I started digging into item placement I realized there was much more potential (and work!) than I had originally anticipated.

Item placement is the feature the enables a player to take an item from their inventory and place it into the world.

I knew right away that I needed item placement to be dynamic and any item could provide a placement component to enable it to be placed into the world. Another thing I knew is that items should be able to define how it can be placed (known as the axis) – on the ceiling, floor, wall, and/or backwall. One last thing that entered my mind before I started programming is that some items should be able to be placed on top of other items – such as a candle can be placed on a table. Once I got the basics implemented and began looking into items supporting other items I had an epiphany.

Items can provide a list of different axes it can be supported on (think ceiling, floor, wall) and for each axis it defines the area the item takes up in the real world and also a list of supports that the axis provides. These supports can specify the side the support is at (top, bottom, left, right) and where the support is at on the item’s side. This basically boils down to one word: Awesomeness.

I will admit that it is a confusing without seeing it in action so here is a quick peek with more to come soon. This is a poor man shrine my friend David threw together.

The tables and shrines are all dynamically placed on a pixel basis and this is why I am truly excited about this feature. Later in the week I plan to write a more thorough write-up on how easy it is to create items with a placement component. I may even include a video of it in action!

Building anything just got personal.